Gruntwork Reference Architecture Setup Instructions
This repository is used to generate the code to deploy and manage the the Gruntwork Reference Architecture. When we have finished the initial deployment, all of the code will be committed to this repository. We will then hand off the architecture for you to use, and we will include instructions for copying the code to your own repository outside of the gruntwork-clients GitHub organization.
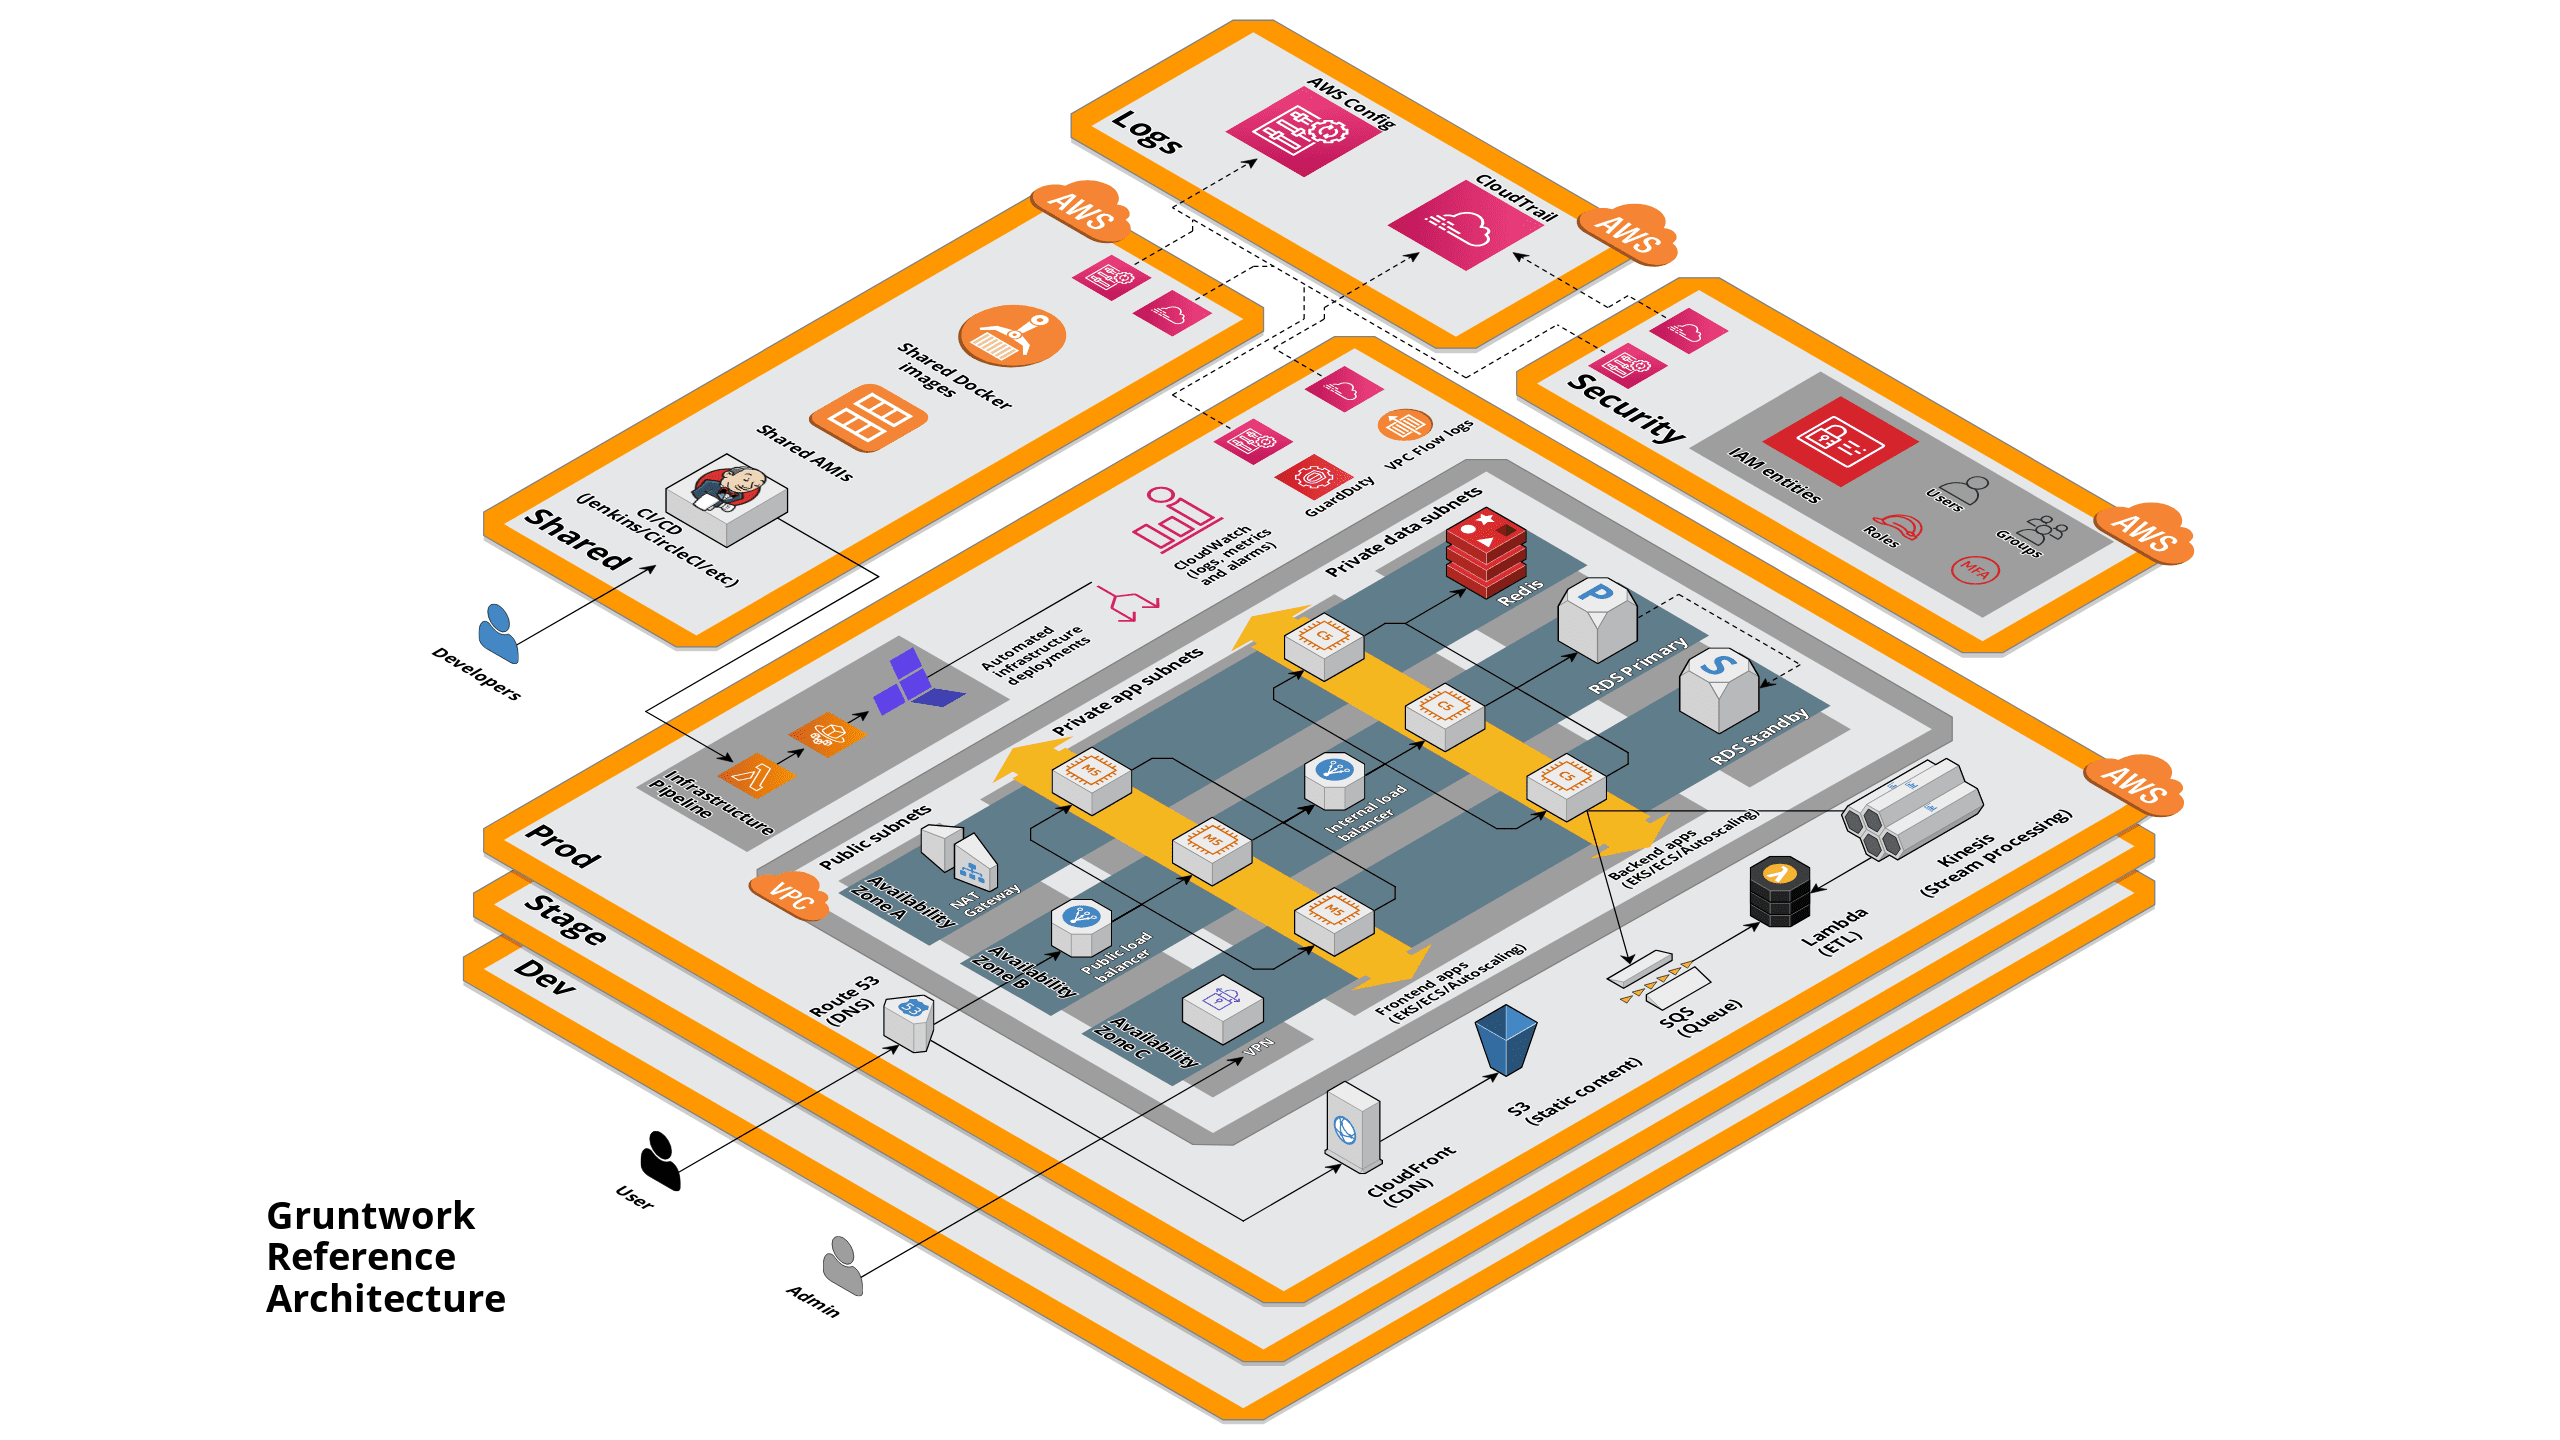 Landing Zone Reference Architecture
Follow the instructions below to prepare for a Reference Architecture deployment:
info
We recommend that you use the Gruntwork CLI tool to automate most of this process for you: https://github.com/gruntwork-io/gruntwork. Note that the Gruntwork CLI is in a private repo that is part of the Gruntwork IaC Library. If you don’t already have access to the Library, please email support@gruntwork.io to get access, or you will get a 404! Once you have access, follow the documentation in the README closely!
caution
Caveat: at this time, the Reference Architecture does not configure or manage the root/management account of an AWS Organization set up. That is, it does not include the account-baseline-root module. Gruntwork is planning to add this in a future enhancement to the reference architecture.
Clone this repository
The very first step is to clone this repository to your local machine. You must have Git installed on your machine. Refer to these instructions to install Git on your platform.
Clone the repository.
git clone git@github.com:gruntwork-clients/<this-repo>.gitCheck out a new branch with your changes:
git checkout -b ref-arch-form
Create and configure AWS Accounts
Create the following AWS accounts:
- Security: for centralized authentication to other accounts, including management of IAM users, groups, and roles.
- Logs: A log archive account that contains a central Amazon S3 bucket for storing copies of all AWS CloudTrail and AWS Config log files.
- Shared: Shared services account for sharing resources such as Amazon Machine Images (AMIs) and Docker images with other accounts. This account can also be used to provide common infrastructure such as self-hosted CI/CD systems (e.g. Jenkins) and monitoring systems (e.g. Grafana) with other accounts.
- Dev: A dedicated app account for development purposes, intended to isolate early development releases from the rest of your infrastructure.
- Stage: A dedicated app account for hosting staging, testing, and/or QA environments.
- Prod: A dedicated app account for production deployments, intended for live environments used by customers.
Once they are created, record the account IDs.
These account IDs will go under
AWSAccountsin the reference architecture form.
For the best results, use Gruntwork CLI to create the accounts. The Gruntwork CLI automatically grants Gruntwork engineers access to your accounts through an IAM role. However, if you choose to create the accounts manually and do not use the Gruntwork CLI, you still MUST run the gruntwork aws grant command to grant the Gruntwork team access to these accounts. MFA is enforced for all Gruntwork access. You can use the same tool to revoke access when the deployment is complete. See CLI documentation for details.
info
- The accounts must be new, empty accounts, with no resources present. That means no EC2 instances, RDS databases, CloudTrail trails, AWS Config recorders, etc.
- Do not apply any Service Control Policies to the accounts as they may interfere with the Terraform resources in the Reference Architecture.
- You can name the dev, stage, and prod accounts anything you like, but the others must be named shared, logs, and security.
Purchase and register domain names
The Reference Architecture uses Route 53 to setup public DNS records for several aspects of the infrastructure, such as the network bastion and the AWS Sample App. For this to work, we ask that you set up domains for each application account (dev, stage, and prod) and, if you’re using Jenkins, in the shared account. These domains should be configured as public hosted zones in Route 53. There are two options for domain registration:
Option A: Register one domain per account (recommended!)
Follow the instructions in the Gruntwork CLI documentation to complete this step.
If you choose not to use the Gruntwork CLI, you may either register a new domain using Route 53 yourself, or you may register a domain using an external provider, and set up Route 53 as the DNS service for that domain.
Explanation
You’ll be using Route 53 to register a separate domain name in the dev, stage, prod accounts, as well as shared if you are using Jenkins.
This is the more secure option because:
- Reduces the chance of making changes to the wrong domain: e.g., accidentally update prod while working on dev.
- Less likely to make a mistake such as issuing cookies for the wrong domain: e.g., accidentally create a cookie in dev that is also accepted in prod.
- Lowers the possibility of issuing TLS certificates for the wrong domain: e.g., accidentally create a TLS cert in dev that is also accepted in prod.
Most domains in Route 53 are just $12, so this should not add much expense.
Option B: Register one domain with subdomains in each account
Follow the instructions in the Route 53 documentation to delegate a subdomain. We recommend that you manage the top-level domain as a hosted zone in either the security or the root account of your AWS Organization, and delegate subdomains to each of the other accounts (e.g. dev, stage, prod, and shared if using Jenkins).
Explanation
You’ll be purchasing one domain (e.g. example.com), and delegate subdomains to each account (e.g. dev.example.com, stage.example.com, etc.). The upside of this approach is that there is a single top-level domain namespace (e.g. example.com) for all of your accounts. However, there are several important downsides:
- You may accidentally make a mistake when managing the top-level domain that may impact all of your subdomains.
- A subdomain such as
prod.example.comis less intuitive for users. This can be mitigated by choosing a top-level domain for prod, and subdomains for non-production environments. - You must be careful about issuing cookies with the
Set-CookieHTTP header so that cookies are valid only for the intended subdomain.
Confirm the domain configuration
Once everything is configured up correctly, check that you can resolve the domains and confirm the nameserver settings using the dig command on MacOS or Linux, or nslookup on Windows. For example, the hosted zone configuration for the gruntwork.in domain used by Gruntwork for testing looks like this in Route 53:

On MacOS or Linux, use
digto confirm that the domain can be resolved correctly over the Internet:$ dig gruntwork.in +short ns
ns-1202.awsdns-22.org.
ns-1749.awsdns-26.co.uk.
ns-559.awsdns-05.net.
ns-67.awsdns-08.com.On Windows, use
nslookup:$ nslookup -type=mx gruntwork.in
Server: 8.8.8.8
Address: 8.8.8.8#53
Non-authoritative answer:
gruntwork.in nameserver = ns-1202.awsdns-22.org.
gruntwork.in nameserver = ns-1749.awsdns-26.co.uk.
gruntwork.in nameserver = ns-559.awsdns-05.net.
gruntwork.in nameserver = ns-67.awsdns-08.com.
Notice that the NS records in the image match the values returned by the commands. The same process applies if you’re using subdomains. Make sure to validate each domain or subdomain in this manner.
Create an infrastructure-live repository
- Create a new repository in your VCS platform. We recommend naming it infrastructure-live.
- In the ref arch form,
InfraLiveRepoURLis where you enter this repo’s HTTPS URL (e.g. https://github.com/gruntwork-io/infrastructure-live.git). InfraLiveRepoSSHURLis where you enter this repo’s SSH URL (e.g. git@github.com:gruntwork-io/infrastructure-live.git).InfraLiveDefaultBranchNameis where you enter your repo’s default branch name (e.g. main).
This current repository will contain all of the infrastructure code you need to extend and operate the environment. For you to have access to all the code, you should copy this code into your newly created infrastructure-live repo once the deployment is done.
Set up the machine user
Whatever VCS platform you are using, do this:
- In GitHub, create a new user account, then create a Personal Access Token (PAT).
- In the ref arch form,
MachineUserGitUsernameandMachineUserGitEmailis where you enter this account’s details. - In the Gruntwork developer portal, add the user to your team, then log in to the portal as the machine user and link the GitHub account. You’ll know it’s set up correctly when you see the Gruntwork icon in the machine user’s GitHub profile, indicating that they are a member of the Gruntwork Organization.
- The PAT should be granted
repo,user:email, andadmin:public_keypermissions. - Once you have the PAT, create a new AWS Secrets Manager secret in the shared account. You can use any name you wish for this secret. See the section Appendix: How to create a secret for the VCS token in AWS Secrets Manager for details.
- Once the secret is created, make a note of the ARN.
- In the ref arch form,
VCSPATSecretsManagerARNis where you enter this ARN.
If you are using GitHub as your VCS, you’re done with this section! If you’re using GitLab or BitBucket, do the following:
For GitLab, use these instructions, and grant the following scopes (NOTE:
api,read_user, andread_apiscopes are only used for uploading the public SSH key for the user. You can replace the token with a new one that only haswrite_repositorypermission after the Reference Architecture is deployed.):write_repositoryapiread_userread_api
For Bitbucket, use these instructions, and grant the following scopes (NOTE:
Account:Writeis only used for uploading the public SSH key for the user. You can replace the token with a new one that only hasRepositories:Writepermission after the Reference Architecture is deployed.):Repositories:WriteAccount:Write
Then create another secret in AWS Secrets Manager in the shared account containing this PAT. Note the ARN, as in the GitHub step above.
In the ref arch form,
GitHubPATSecretsManagerARNis where you enter this ARN.
Explanation
The reference architecture includes an end-to-end CI/CD pipeline for infrastructure. You’ll need to set up a machine user (also known as a service account) that will automatically checkout your code, push artifacts (such as Docker images and AMIs), and access the Gruntwork IaC Library.
You need one machine user in GitHub to access the repos in the Gruntwork IaC Library. If you’re not using GitHub, (e.g., in BitBucket or GitLab), you’ll need to create a machine user for that VCS.
Fill out the reference architecture form
The reference architecture form is a YAML file that contains all the fields that Gruntwork needs to deploy your reference architecture.
You’ll need all the information you’ve noted in the previous steps. This is where you’ll also be able to customize your infrastructure by choosing a compute option (e.g. ASG, ECS, or EKS), a cache cluster (Redis or Memcached), and a database (e.g. MySQL, PostgreSQL, Aurora, etc). The form contains detailed descriptions of each field.
YAML files are space-sensitive. As you edit the file, be sure to retain the correct whitespace! This should be apparent as you review the file.
- Open
reference-architecture-form.ymlin a text editor. - Update the replace-me placeholder text in each field. Use double quotes (
"") to wrap the values, as shown in the examples.
If you’re unsure about how to answer any of the questions, email support@gruntwork.io and let us know!
Complete the set up process and open a pull request to engage our GitHub Automations
Review your changes. If you notice any errors, correct them, and rerun:
git diffCommit the changes and push to the remote repository:
git add reference-architecture-form.yml
git commit -m 'Completed reference architecture form.'
git push origin ref-arch-form
Use Preflight Checks to iterate on your form and fix any configuration issues
 Gruntwork Preflight Checks on GitHub
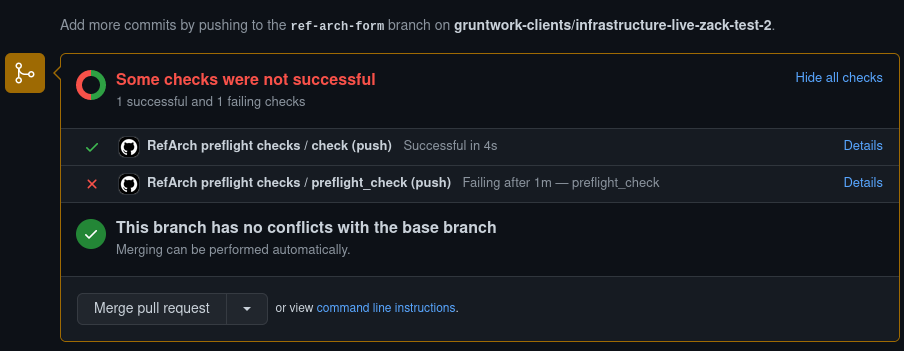
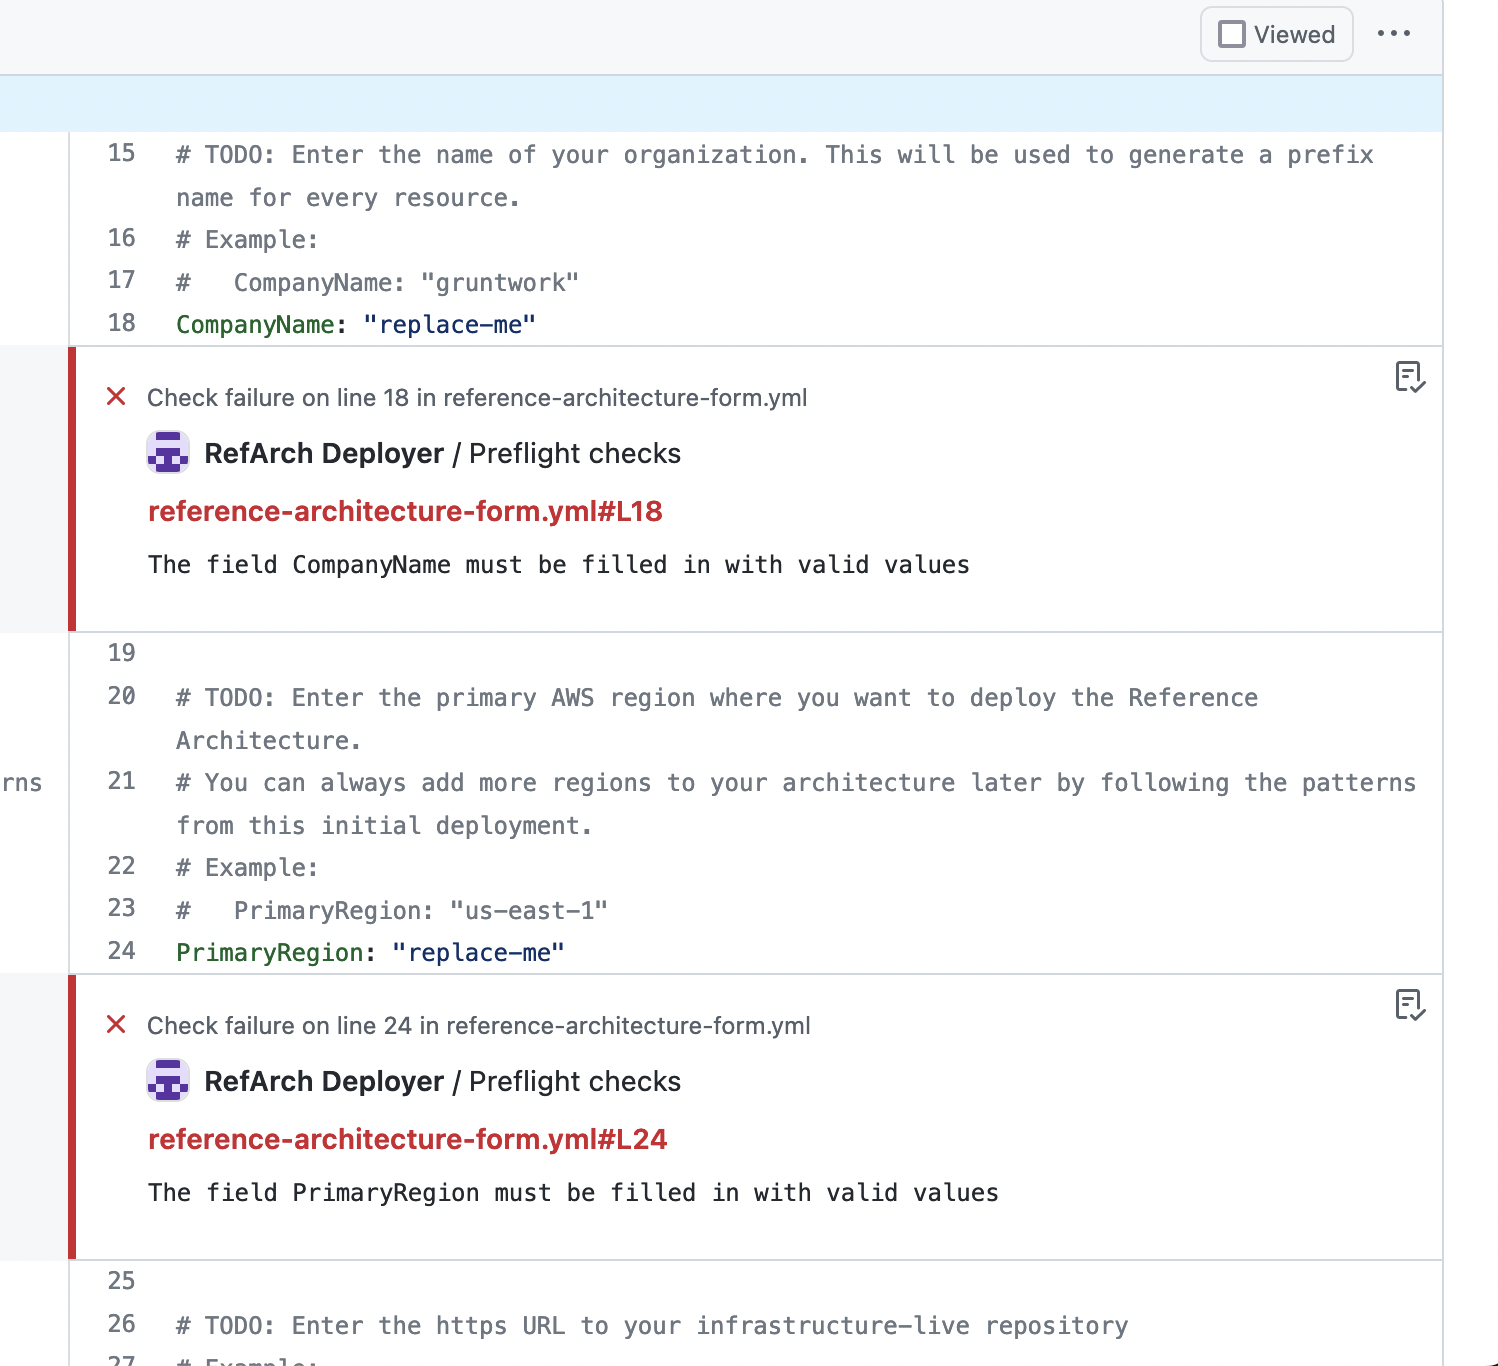
Once your form is filled in and pushed to GitHub, our GitHub automations will take over. You'll notice a special GitHub check called Preflight Checks that will run against your reference-architecture-form.yml file and flag any errors for you directly in your pull request, like so:
 Gruntwork Preflight Checks
You can then locally iterate on your form by editing reference-architecture-form.yml on the ref-arch-form branch and pushing your changes up to GitHub. Each time you make a new commit and push it, the Gruntwork Preflight Checks will be run against your form.
Keep iterating on your form and pushing new commits up until the Preflight Checks check passes and you see no more error annotations on your pull request.
Next Steps
Once all your Preflight Checks pass, you can merge your pull request, which will commence your Ref Arch deployment.
Gruntwork engineers are automatically notified of each new Ref Arch deployment, so there's no need to reach out to support just to inform us that your deployment has commenced.
Gruntwork engineers will monitor your deployment and receive notifications about failures and issues that may require intervention to resolve.
Gruntwork engineers rotate through all active deployments to fix up issues preventing them from making forward progress. In general, deployments take "A few days", although there are plenty of variables outside of our control that can occasionally interfere with a deployment, and which may take longer to remediate.
Gruntwork engineers will reach out to you to communicate a status update or next steps if your deployment requires additional intervention to complete.
Appendix: How to create a secret for the VCS token in AWS Secrets Manager
To create a secret in AWS Secrets Manager, first open the AWS console for the shared AWS account, and navigate to the Secrets Manager console.

Next, choose Store a new secret.

Choose Other types of secrets, then click on Plaintext, then paste the value of your PAT in the text field.
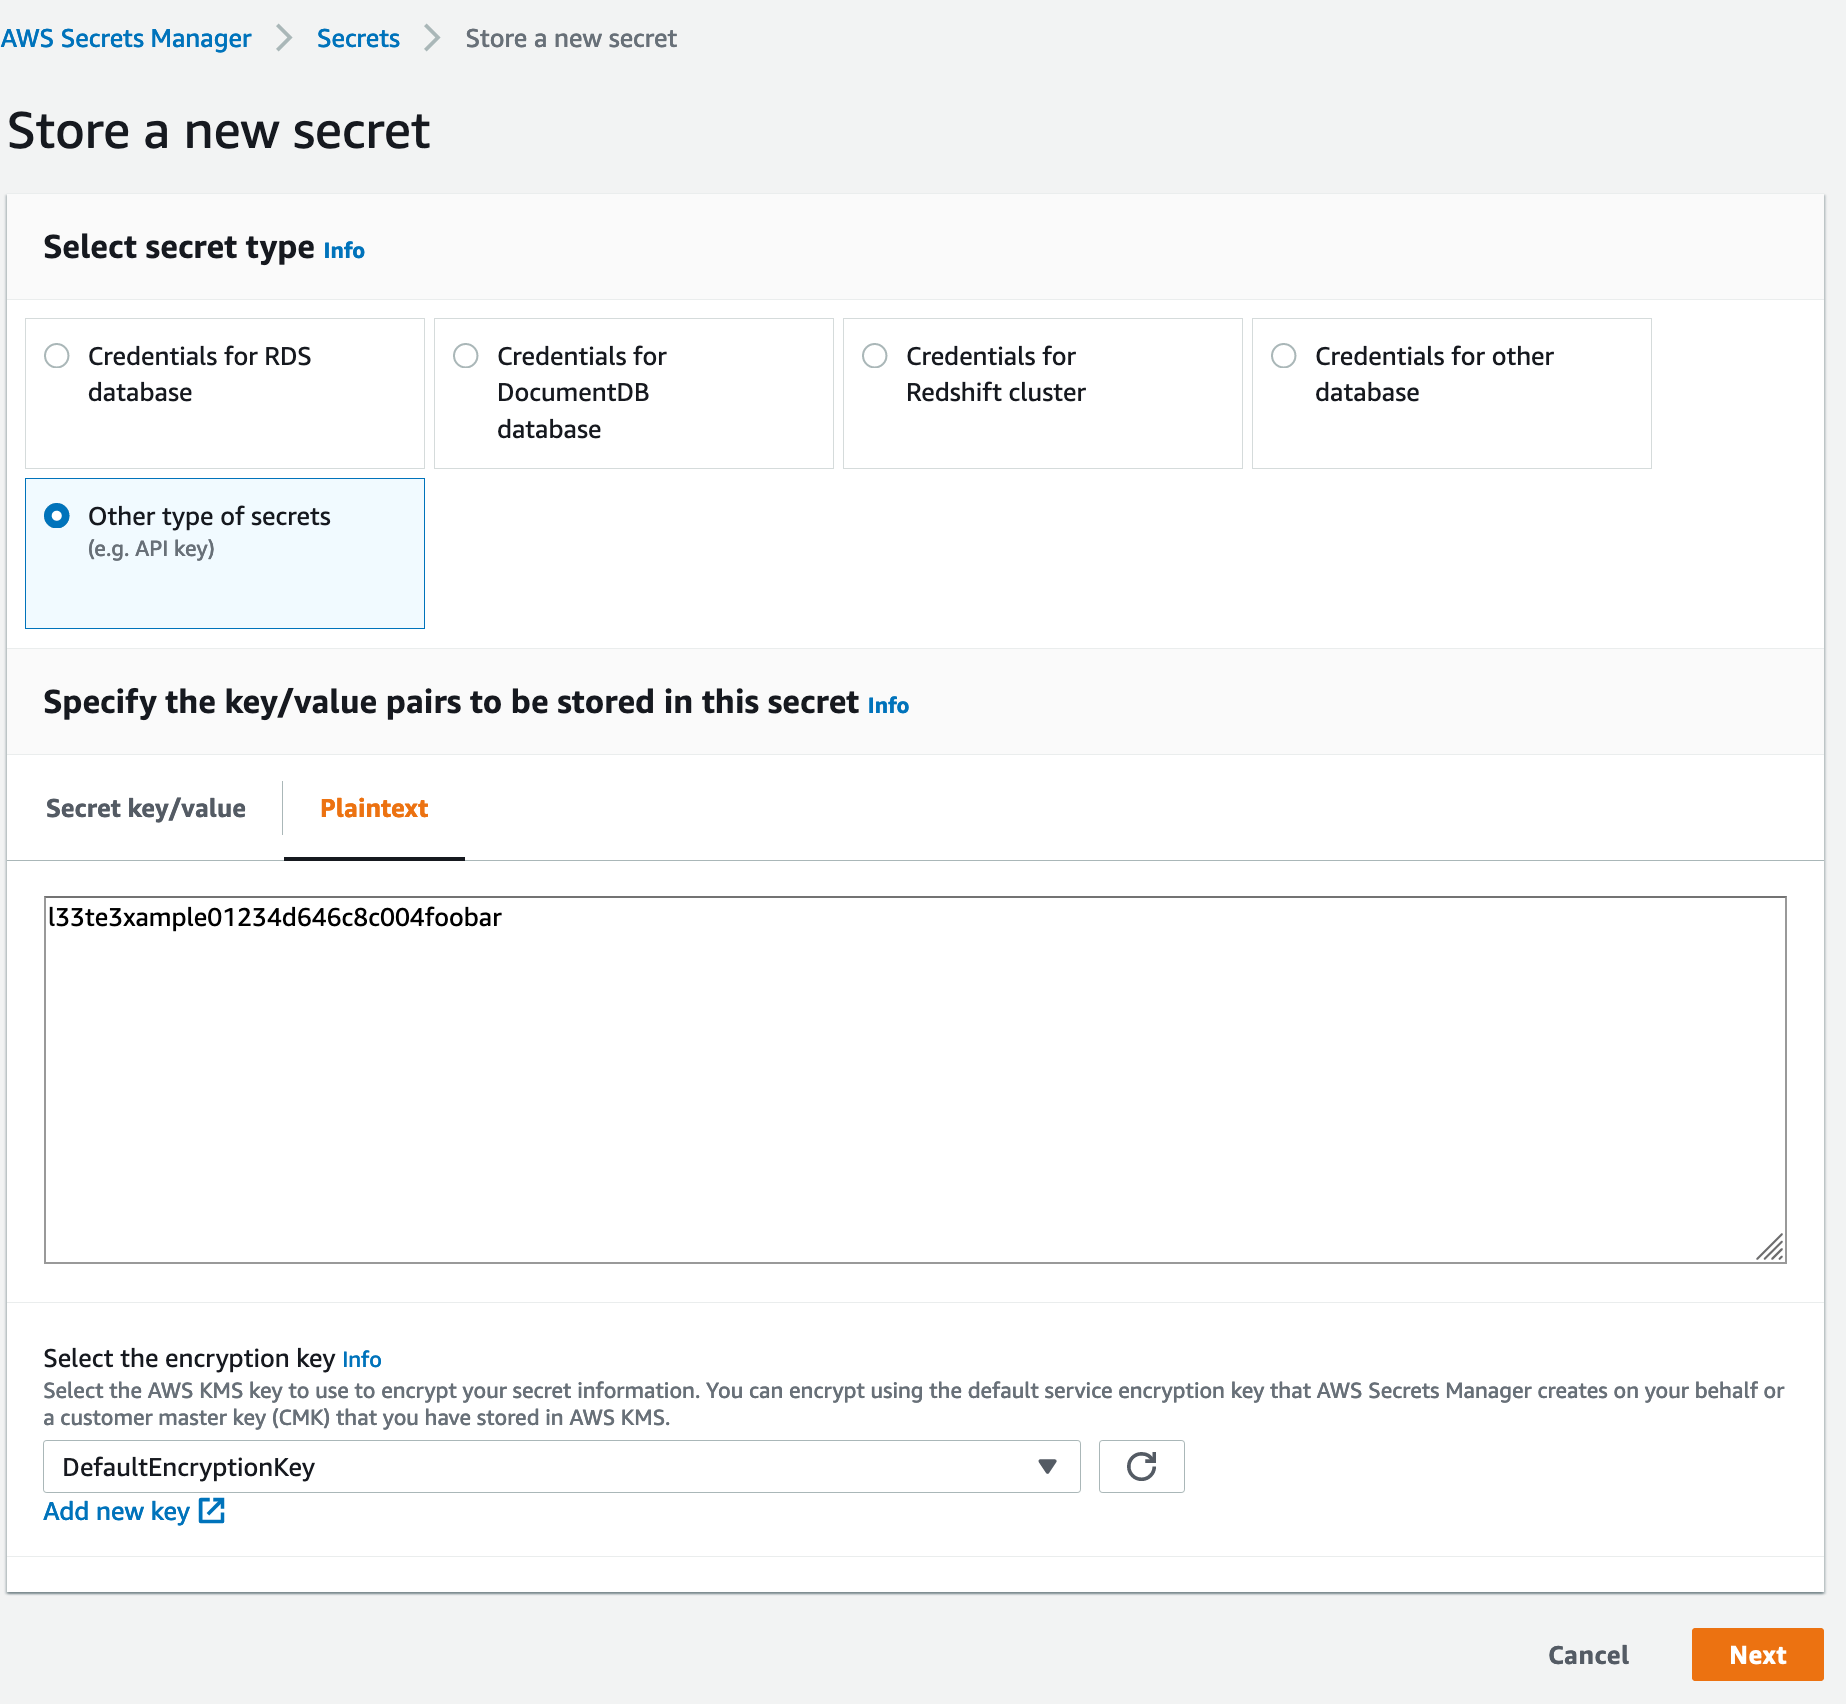
Click Next to continue.
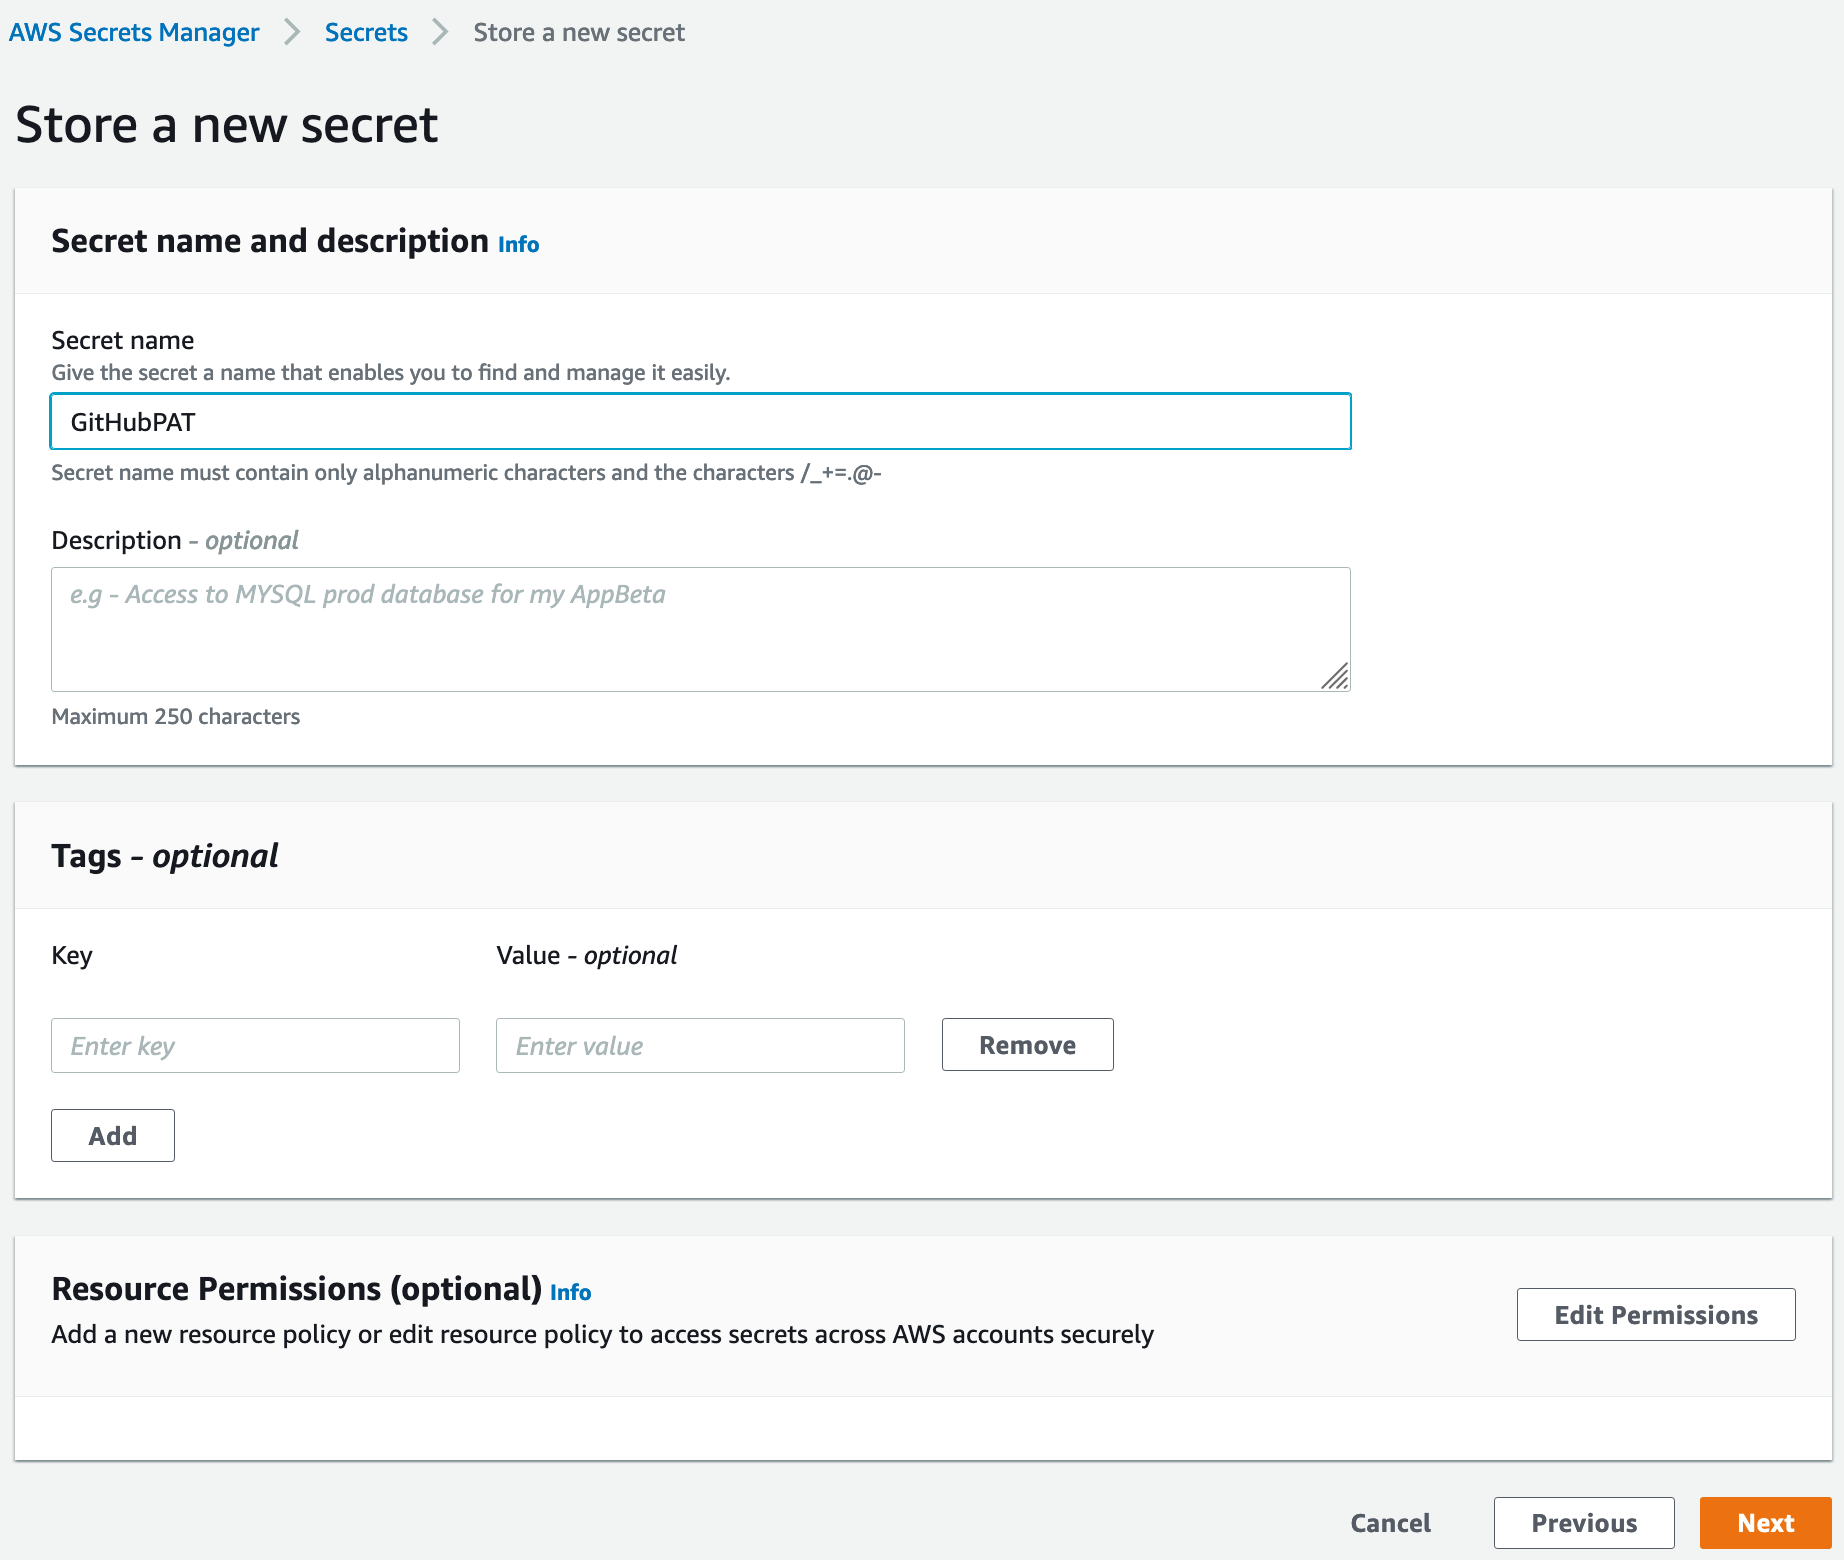
Choose a name for the secret (we’ve chosen GitHubPAT here), then click Next through the remaining screens and save the secret. Once the secret is created, you’ll find it in the list of secrets. If you click on the secret, you’ll see the secret ARN in the fields.
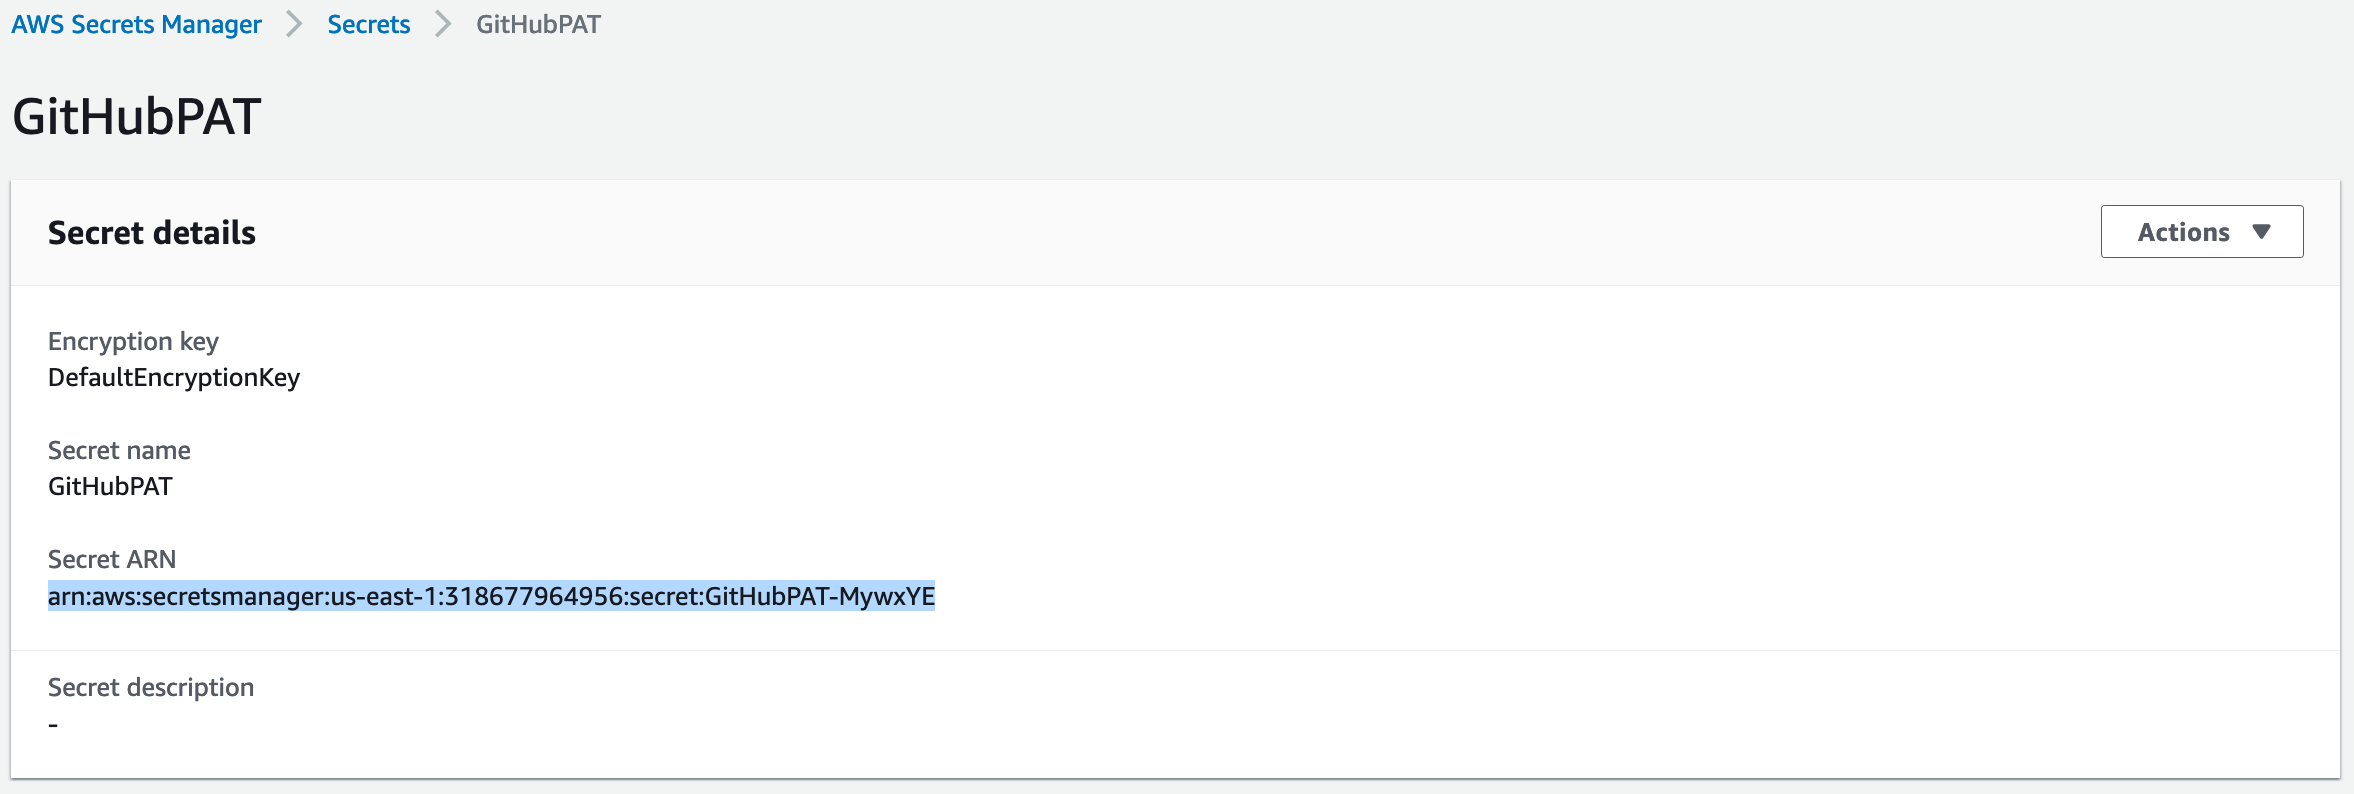
In the ref arch form, VCSPATSecretsManagerARN is where you enter this ARN.